其它资源
其它资源
 友链申请
友链申请
Netty框架学习之(二):Netty入门Demo详解
今天通过一个入门案例来共同学习以下netty框架的简单应用.
工具
idea(eclipse),jdk1.8及以上
假设你以上所需的工具都已经准备好了,那我们就开始我们的学习之旅吧
这篇文章的主旨是了解netty框架的一个demo案列的讲解,如果想了解netty是什么或者说netty的一些特性或功能的,可以自行百度.
废话不多说了,直接进入我们今天的主题吧.
1,jar包下载
想要使用netty框架的话首先的需要下载netty的jar包,这里推荐一个还算挺好用的jar包下载仓库.sonatype.
这是首页,出现的头像是对此仓库做出贡献的人的感谢.
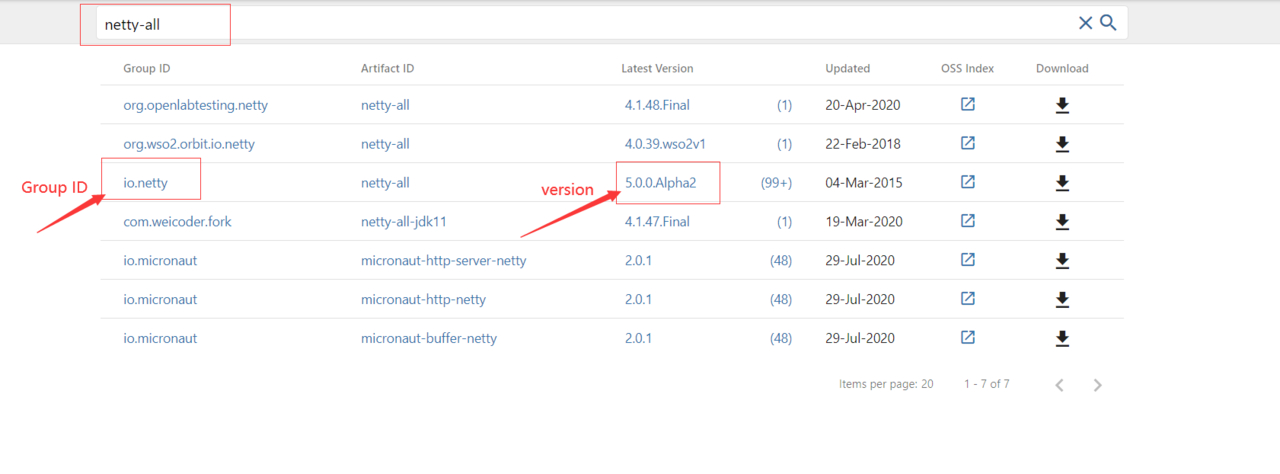
直接在搜索框中输入netty-all即可,之后确认以下Group-ID和version,我们这里用的是IO-netty家的,版本是最新的5.0.0.Alpha.
点击对应的版本直接进去下载即可,有好几种下载方式,这里我们选择jar包下载.
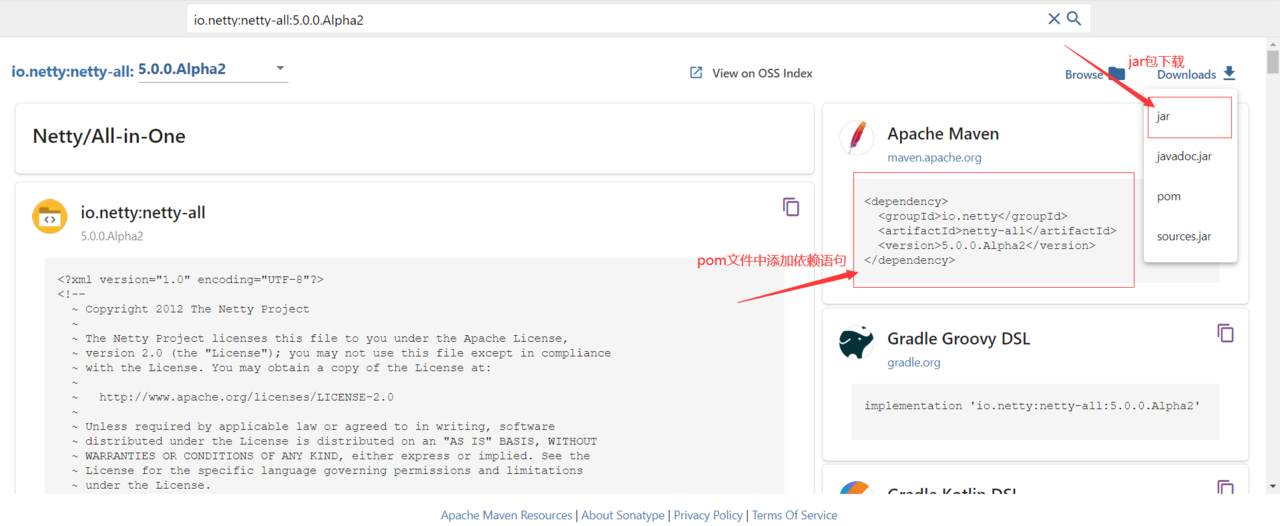
下载完成后在你的下载目录会看见这样一个jar文件,至此jar包下载完成.jar文件名即你下载的名称及版本.

2,创建工程
打开idea,创建工程,因为demo并不复杂,故创建一个普通工程即可.
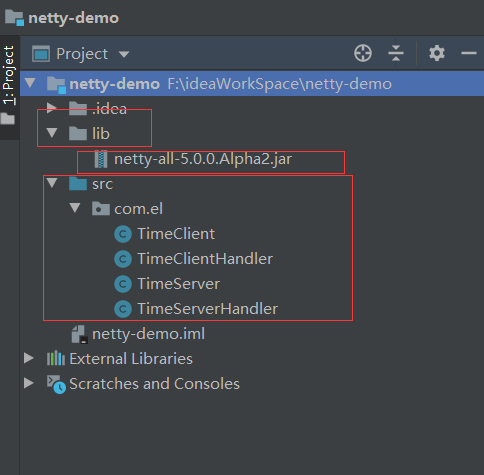
下图是创建完成后的工程目录,lib用来存放管理工程所需要的jar包,src下是项目的主体.
接下来就是把jar包加载进工程了.
file-->Project Structure
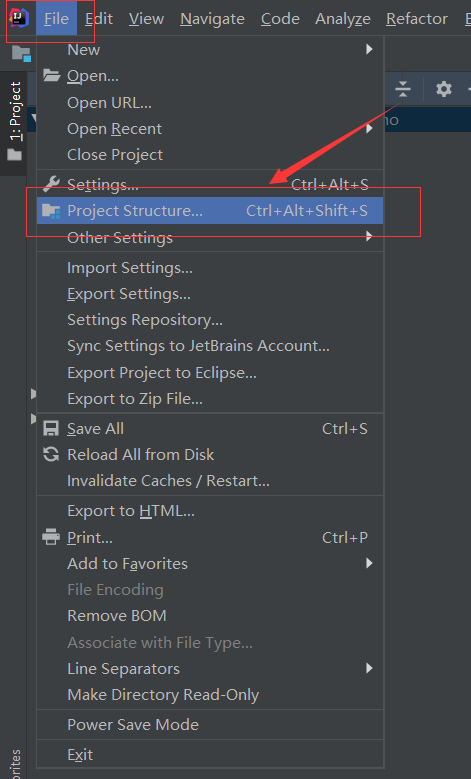
点击Library,点击+好,之后找到你自己的工程里lib文件夹下的jar包,点击ok.
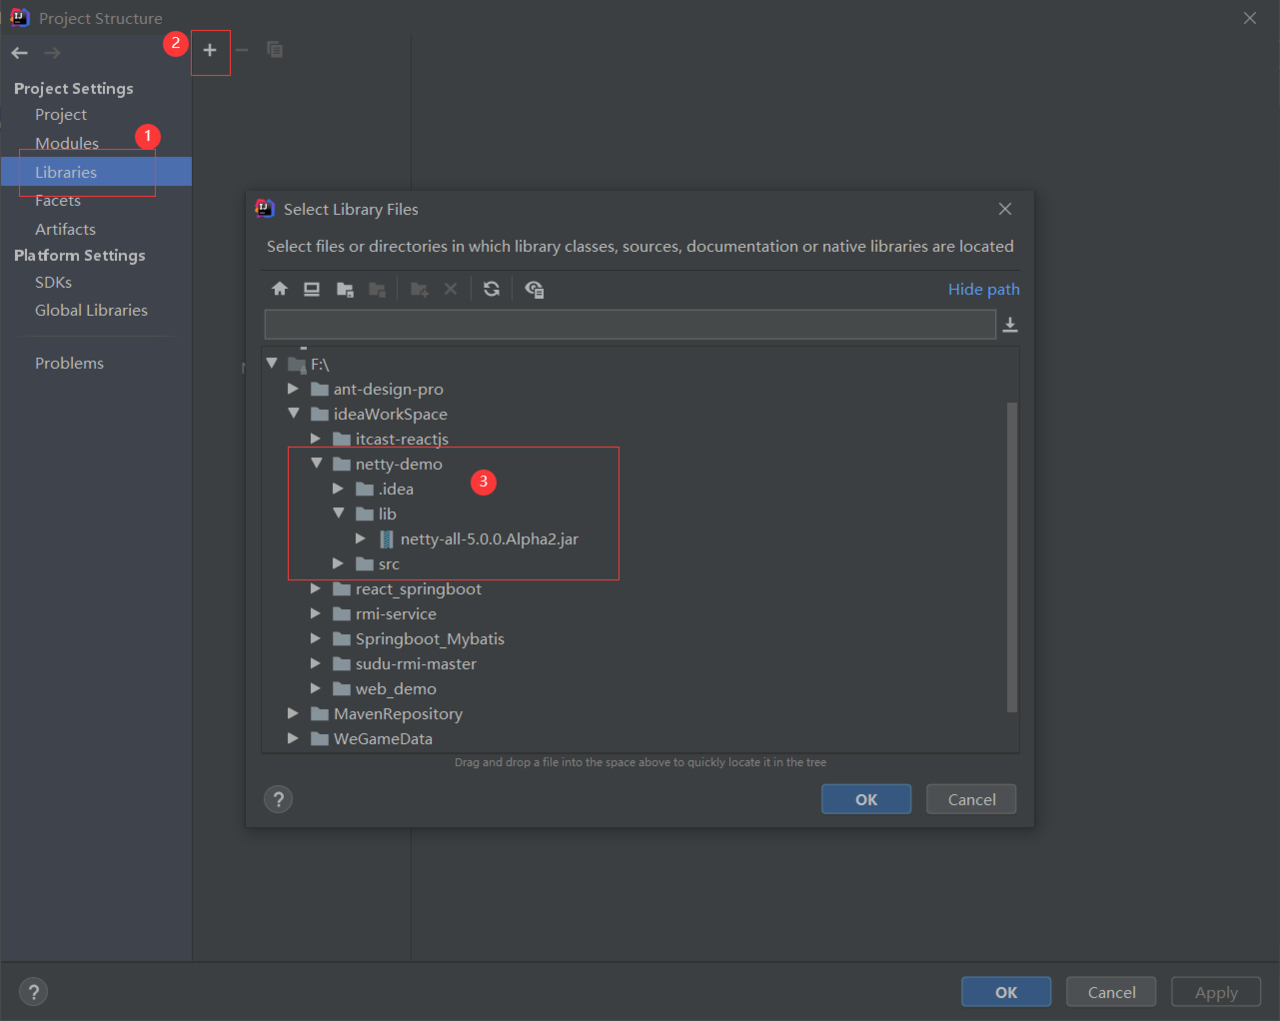
Classes中既是你添加的jar包,点击apply即可.

3,接下来就是代码了,下面我们一个类一个类来推进.
3.1 TimeServer的编写
package com.el;
import io.netty.bootstrap.ServerBootstrap;
import io.netty.channel.ChannelFuture;
import io.netty.channel.ChannelHandler;
import io.netty.channel.ChannelInitializer;
import io.netty.channel.ChannelOption;
import io.netty.channel.nio.NioEventLoopGroup;
import io.netty.channel.socket.SocketChannel;
import io.netty.channel.socket.nio.NioServerSocketChannel;

public class TimeServer {
public void bind(int port) throws Exception {
//创建两个NioEventLoopGroup线程组,一个用于服务端接收连接,一个用于进行SocketChannel的网络读写
NioEventLoopGroup bossGroup = new NioEventLoopGroup();
NioEventLoopGroup workerGroup = new NioEventLoopGroup();
try {
//创建Nio服务端的辅助启动类
ServerBootstrap b = new ServerBootstrap();
b.group(bossGroup, workerGroup)
.channel(NioServerSocketChannel.class)
.option(ChannelOption.SO_BACKLOG, 1024)
.childHandler(new ChildChannelHandler());
ChannelFuture f = b.bind(port).sync();
f.channel().closeFuture().sync();
} finally {
//优雅推出机制,放在finally代码块内
bossGroup.shutdownGracefully();
workerGroup.shutdownGracefully();
}

}
private class ChildChannelHandler extends ChannelInitializer {
@Override
protected void initChannel(SocketChannel sch) throws Exception {
sch.pipeline().addLast(new TimeServerHandler());
}
}
public static void main(String[] args) throws Exception {
//设置固定端口,之后校验端口是否可以更改.
int port = 8080;
if(args !=null&& args.length>0){
try {
port =Integer.valueOf(args[1]);
} catch (NumberFormatException e){
e.printStackTrace();
}
}
//调用自己写的bind方法来启动
new TimeServer().bind(port);
}
}
- 利用辅助类的group方法将两个线程组当作参数传递到ServerBootStrap中
- 接着设置channal为NioServerSocketChannel
- 之后设置channal为NioServerSocketChannel的TCP参数,这里将数组设置为1024
- 最后绑定IO事件的处理类ChildChannelHandler,用于处理网络IO事件.
- 服务端启动完成后调用bind方法绑定端口并设置监听.
下面来看一下TimeServerHandler的代码
package com.el;
import io.netty.buffer.ByteBuf;
import io.netty.buffer.Unpooled;
import io.netty.channel.ChannelHandlerAdapter;
import io.netty.channel.ChannelHandlerContext;

import java.util.Date;

public class TimeServerHandler extends ChannelHandlerAdapter {
@Override
public void channelRead(ChannelHandlerContext ctx, Object msg) throws Exception {
//将msg转换成Netty的ByteBuf对象
ByteBuf buf = (ByteBuf) msg;
byte[] req = new byte[buf.readableBytes()];
buf.readBytes(req);
String body =new String(req,"UTF-8");
System.out.println("The time server receive order :"+body);
String currentTime = "Time".equalsIgnoreCase(body) ? new Date(System.currentTimeMillis()).toString() : "BAD ORDER";
//创建一个新的ByteBuf对象来存时间
ByteBuf resp = Unpooled.copiedBuffer(currentTime.getBytes());
//异步发送消息给客户端
ctx.write(resp);
}

@Override
public void exceptionCaught(ChannelHandlerContext ctx, Throwable cause) throws Exception {
ctx.close();
}

@Override
public void channelReadComplete(ChannelHandlerContext ctx) throws Exception {
ctx.flush();
}
}
- flush():发送队fas列中的消息写入到SocketChannel中发送给对方
- close():当发生异常时,关闭ChannelHandlerContext,释放资源.
3,TimeClient代码:
package com.el;

import io.netty.bootstrap.Bootstrap;
import io.netty.channel.ChannelFuture;
import io.netty.channel.ChannelInitializer;
import io.netty.channel.ChannelOption;
import io.netty.channel.nio.NioEventLoopGroup;
import io.netty.channel.socket.SocketChannel;
import io.netty.channel.socket.nio.NioSocketChannel;

public class TimeClient {
    public void connect(int port,String host) throws Exception {
        //配置客户端NIO线程组
        NioEventLoopGroup Group = new NioEventLoopGroup();
        try {
            Bootstrap b = new Bootstrap();
            b.group(Group)
                    .channel(NioSocketChannel.class)
                    .option(ChannelOption.TCP_NODELAY, true)
                    .handler(new ChannelInitializer<SocketChannel>() {
                        @Override
                        protected void initChannel(SocketChannel sch) throws Exception {
                            sch.pipeline().addLast(new TimeClientHandler());
                        }
                    });
            //发起异步连接操作
            ChannelFuture f = b.connect(host,port).sync();
            //等待客户端链路关闭
            f.channel().closeFuture().sync();
        } finally {
            //优雅退出,释放NIO线程组
            Group.shutdownGracefully();
        }

    }
    public static void main(String[] args) throws Exception {
        int port = 8080;
        if(args !=null&& args.length>0){
            try {
                port =Integer.valueOf(args[1]);
            } catch (NumberFormatException e){
                e.printStackTrace();
            }
        }
	    //调用connet方法发起异步连接
            new TimeClient().connect(port,"127.0.0.1");
    }
}
4,TimeClientHandler代码:
package com.el;
import io.netty.buffer.ByteBuf;
import io.netty.buffer.Unpooled;
import io.netty.channel.ChannelHandlerAppender;
import io.netty.channel.ChannelHandlerContext;

public class TimeClientHandler extends ChannelHandlerAppender {

    private final ByteBuf firstMessage;

    public TimeClientHandler() {
        byte[] req = "QUERY TIME ORDER".getBytes();
        firstMessage = Unpooled.buffer(req.length);
        firstMessage.writeBytes(req);
    }

    @Override
    public void channelActive(ChannelHandlerContext ctx) throws Exception {
        ctx.writeAndFlush(firstMessage);
    }

    @Override
    public void channelRead(ChannelHandlerContext ctx, Object msg) throws Exception {
        ByteBuf buf = (ByteBuf) msg;
        byte[] req = new byte[buf.readableBytes()];
        buf.readBytes(req);
        String body = new String(req, "UTF-8");
        System.out.println("Now is :"+body);
    }

    @Override
    public void exceptionCaught(ChannelHandlerContext ctx, Throwable cause) throws Exception {
        //释放资源
        ctx.close();
    }
}
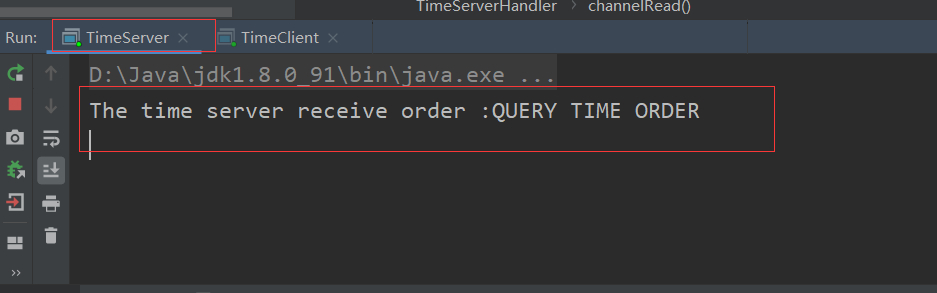
5,结果演示
先启动server端,再启动client端,展示结果如下:
server结果:
client结果:
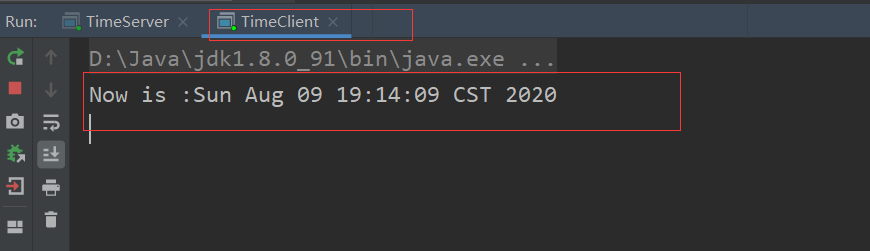
总结:client发起请求的字符```"QUERY TIME ORDER",server端经过校验后返回当前时间给client端.
至此,关于netty框架的一个简单demo就说完了,大家有疑惑或者见解都可以提出来,我也是新人,大家互相学习互相进步吧,谢谢!!!
标题:Netty框架学习之(二):Netty入门Demo详解
作者:tangdou
地址:https://www.mmzsblog.cn/articles/2020/08/09/1596972099745.html
如未加特殊说明,文章均为原创,转载必须注明出处。均采用CC BY-SA 4.0 协议!
本网站发布的内容(图片、视频和文字)以原创、转载和分享网络内容为主,如果涉及侵权请尽快告知,我们将会在第一时间删除。若本站转载文章遗漏了原文链接,请及时告知,我们将做删除处理!文章观点不代表本网站立场,如需处理请联系首页客服。• 网站转载须在文章起始位置标注作者及原文连接,否则保留追究法律责任的权利。
• 公众号转载请联系网站首页的微信号申请白名单!